
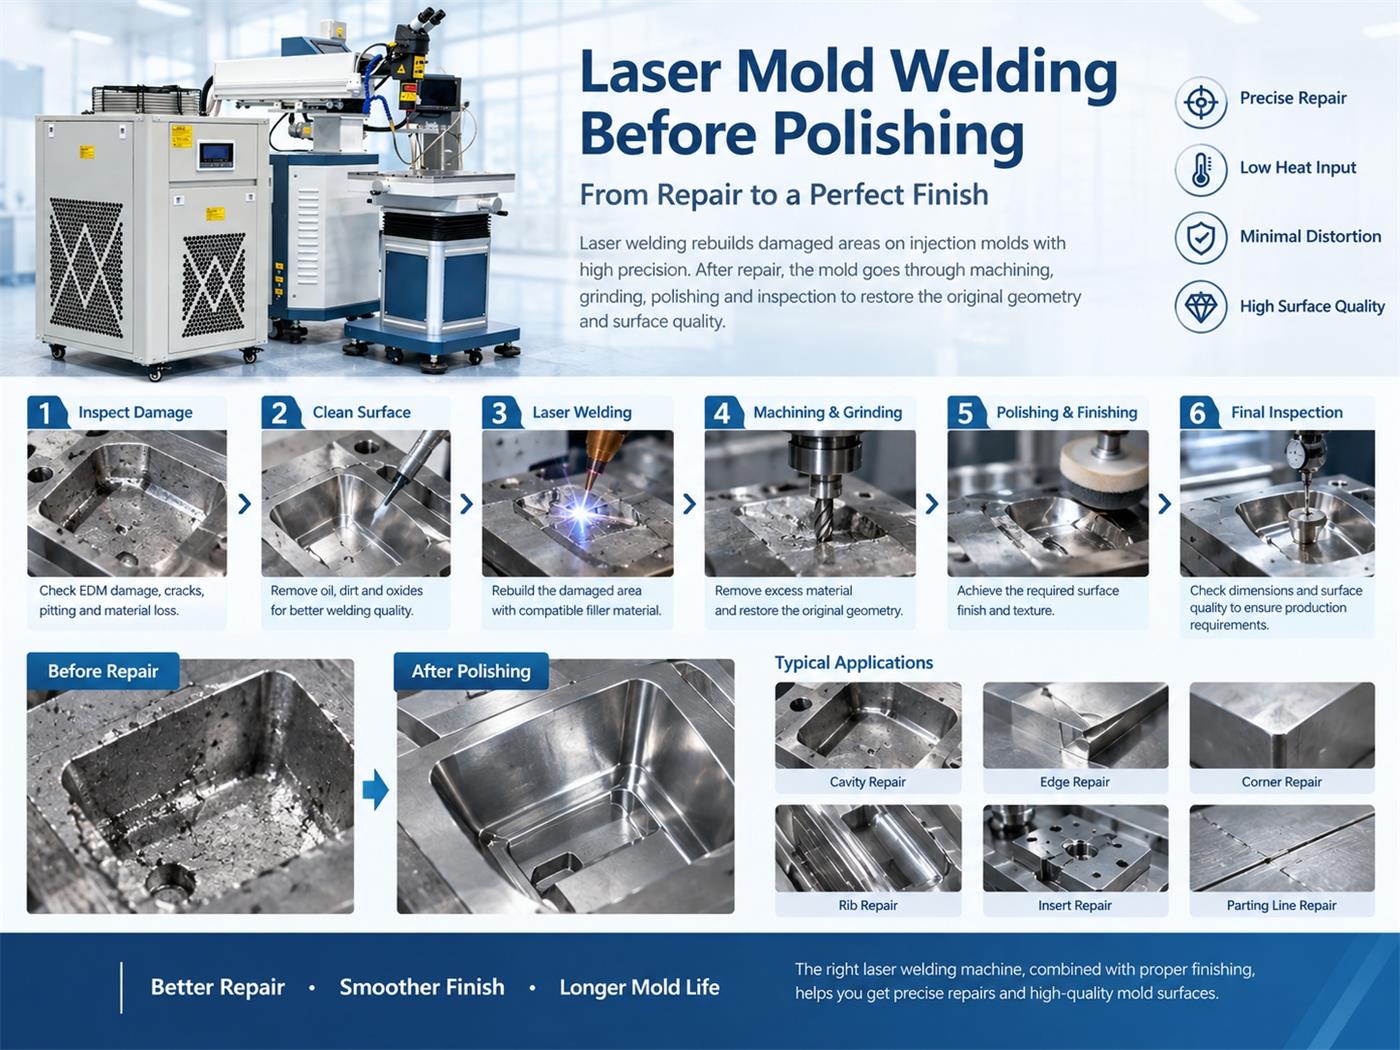
Laser welding is often only the repair stage of injection mold restoration. After a damaged area has been rebuilt with laser welding, the mold usually still needs machining, grinding, polishing, and dimensional inspection before it can return to production.
Understanding what happens after laser mold welding is important because the quality of the final mold depends not only on the weld itself, but also on how the repaired area is finished.
What Does a Mold Look Like After Laser Welding?
When laser welding is used to repair a mold, filler material is normally deposited onto the damaged area. This can restore missing material caused by:
-
Cracks
-
EDM damage
-
Wear
-
Pitting
-
Broken edges
-
Damaged corners
-
Dimensional errors
-
Machining mistakes
After welding, the repaired area usually contains slightly excess material. This is intentional.
The operator does not normally try to make the welded area perfectly flush with the surrounding mold surface during welding. Instead, enough material is deposited to ensure that the damaged area is completely rebuilt, leaving machining and polishing allowance for the next stages.
Step 1: Inspect the Laser-Welded Area
Before polishing begins, the repaired area should be inspected.
The operator checks whether the weld has:
-
Completely filled the damaged area
-
Proper bonding with the base metal
-
Any visible cracks or pores
-
Sufficient material for subsequent machining
-
The correct approximate geometry
For precision injection molds, visual inspection alone may not be enough. Dimensional measurement can also be required, particularly when repairing cavities, parting lines, inserts, or sharp edges.
Step 2: Remove Excess Weld Material
The next step is to bring the welded area closer to the original mold geometry.
Depending on the size and location of the repair, this can involve:
-
Grinding
-
Milling
-
Filing
-
CNC machining
-
Precision hand finishing
For a large repaired area, machining may remove most of the excess filler material.
For very small repairs, a skilled technician may use controlled manual finishing to avoid removing too much material.
The goal is to restore the original geometry, rather than simply making the weld visually smooth.
Step 3: Restore Critical Mold Dimensions
This is particularly important for injection molds.
A repaired cavity or core must match the required dimensions of the original design. If too much material is removed during post-weld machining, the repaired area can become undersized. If insufficient material is removed, it can affect the dimensions of the molded plastic part.
Therefore, the repaired area should be measured against the mold drawing, CAD model, or an undamaged reference area where appropriate.
For precision mold repair, laser welding and dimensional machining work together:
Laser welding adds material; machining removes excess material and restores the required geometry.
Step 4: Surface Grinding and Finishing
Once the geometry has been restored, the repaired surface can be progressively refined.
The finishing method depends on the original mold surface.
A mold may require:
-
Grinding
-
Stone polishing
-
Diamond polishing
-
Mirror polishing
-
EDM finishing
-
Texturing
For example, a high-gloss injection mold cavity may require much finer polishing than a relatively rough mold surface.
The welded area must ultimately blend into the surrounding surface without creating a visible step or depression.
Step 5: Polishing the Repaired Mold
Polishing is often one of the most important final stages.
A poorly finished laser repair can remain visible even when the welding itself is technically sound.
During polishing, the technician gradually removes machining marks and blends the repaired area with the surrounding mold surface.
For molds used to produce optical or high-gloss plastic parts, the requirements can be particularly demanding.
The filler material should therefore be selected not only for weld compatibility, but also for its machinability and polishing behavior.
Step 6: Recreate the Original Surface Finish
Not every injection mold requires mirror polishing.
Some molds have:
-
EDM textures
-
Sandblasted finishes
-
Etched textures
-
Fine machining marks
-
Custom surface patterns
In these cases, the repaired section may need to be retextured after laser welding.
This is an important point: a successful laser repair is not necessarily finished when the weld becomes invisible. The surface must also reproduce the functional or cosmetic finish required by the mold.
Step 7: Final Dimensional Inspection
After polishing and surface treatment, the repaired area should be inspected again.
Depending on the mold, inspection can include:
-
Dimensional measurement
-
Surface inspection
-
Profile measurement
-
Visual comparison
-
Mold fitting
-
Trial molding
For high-precision components, the repaired area may need to be checked against CAD data or measurement equipment.
The final objective is to confirm that the repaired mold has returned to its required dimensional and surface condition.
Why Leave Extra Material During Laser Welding?
This is one of the most important concepts in mold laser repair.
Suppose a mold corner has lost 0.2 mm of material. A technician may deliberately deposit slightly more material than the final dimension requires.
After welding, the area might therefore appear raised.
This does not necessarily mean the repair was poorly performed.
The additional material provides machining allowance. The technician can then gradually remove the excess and restore the exact original profile.
This approach is particularly useful when repairing:
-
Sharp corners
-
Parting lines
-
Cavity edges
-
Small holes
-
Worn surfaces
-
EDM pits
-
Mold inserts
Does Laser Welding Make Polishing Easier?
It can, provided the repair is properly executed.
A controlled laser weld can deposit filler material precisely where it is required. This reduces the amount of unnecessary material that needs to be removed afterward.
However, polishing performance also depends on the filler wire, mold steel, welding parameters, repair size, and technician’s finishing process.
For high-quality mold repair, welding and polishing should be treated as one continuous restoration process, rather than two completely independent operations.
What Happens If the Weld Is Not Properly Prepared for Polishing?
Several problems can appear.
Visible Repair Marks
If the repaired area does not blend correctly with the surrounding surface, the repair may remain visible after polishing.
Dimensional Errors
Removing too much material can change the cavity or core dimensions.
Uneven Surface Finish
The repaired section may have a different appearance from the original mold surface.
Additional Rework
Poor welding or excessive filler material can increase grinding and polishing time.
This is why experienced mold repair technicians consider the final finishing process before they begin welding.
Which Mold Steels Can Be Laser Welded and Polished?
Laser mold welding is commonly applied to tool steels such as:
-
P20
-
H13
-
S136
-
718
-
Other compatible mold and tool steels
However, the welding and finishing procedure should be adapted to the specific steel grade and its heat-treatment condition.
The filler wire is also important. The repaired material should be compatible with the base metal and suitable for the required machining, polishing, and surface treatment.
How Does Laser Mold Welding Compare With Traditional Repair Welding?
For precision mold repair, one of the main advantages of laser welding is its ability to deposit material in a very localized area.
Traditional welding can introduce more heat and may require more extensive post-weld machining or correction.
A pulsed laser mold welding machine allows the technician to control parameters such as pulse energy, duration, frequency, and spot size. This can help keep the repair area small and reduce unnecessary thermal exposure.
That is particularly valuable when the mold contains fine details or tight dimensional tolerances.
The Complete Post-Welding Process
A typical injection mold repair workflow can be summarized as:
Damage inspection → Surface preparation → Laser welding → Weld inspection → Excess material removal → Machining/grinding → Polishing → Surface texturing if required → Dimensional inspection → Trial molding
The exact process varies according to the type and severity of the defect.
For a small EDM pit, the process may be relatively simple. For a damaged cavity edge or complex mold insert, several machining and finishing stages may be necessary.
Final Thoughts
Laser welding is not the end of mold repair—it is the beginning of the restoration process.
After the damaged area has been rebuilt, the excess weld material is carefully removed, the original geometry is restored, and the surface is ground, polished, or textured to match the surrounding mold.
This is why selecting the right laser mold welding machine is only one part of successful mold repair. Welding parameters, filler material, machining allowance, polishing requirements, and final dimensional accuracy all need to be considered together.
For injection mold manufacturers and repair shops, a pulsed YAG mold laser welding machine can provide the precise material deposition required for repairing small defects while leaving sufficient control for subsequent machining and polishing.
FAQ
Should a laser-welded mold be polished?
Usually, yes, if the repaired area forms part of the finished mold surface. The required finishing method depends on the original surface condition.
Does laser welding leave excess material?
Yes. In many repairs, slightly more filler material is intentionally deposited so that the area can be machined back to the required dimension.
Can a laser-welded mold be mirror polished?
Yes, when the mold steel, filler material, welding process, and finishing procedure are properly matched. High-polish applications require careful control throughout the repair process.
Can EDM texture be restored after laser welding?
Yes. Depending on the mold design, the repaired area can be reprocessed to reproduce the required EDM or other surface texture.
How long does polishing take after laser mold welding?
There is no fixed time. A small repair may require only limited finishing, while a large or highly polished cavity can require substantially more grinding and polishing work. The repair size, mold steel, geometry, and required surface finish all affect the time.
Post time: Sep-14-2026
