
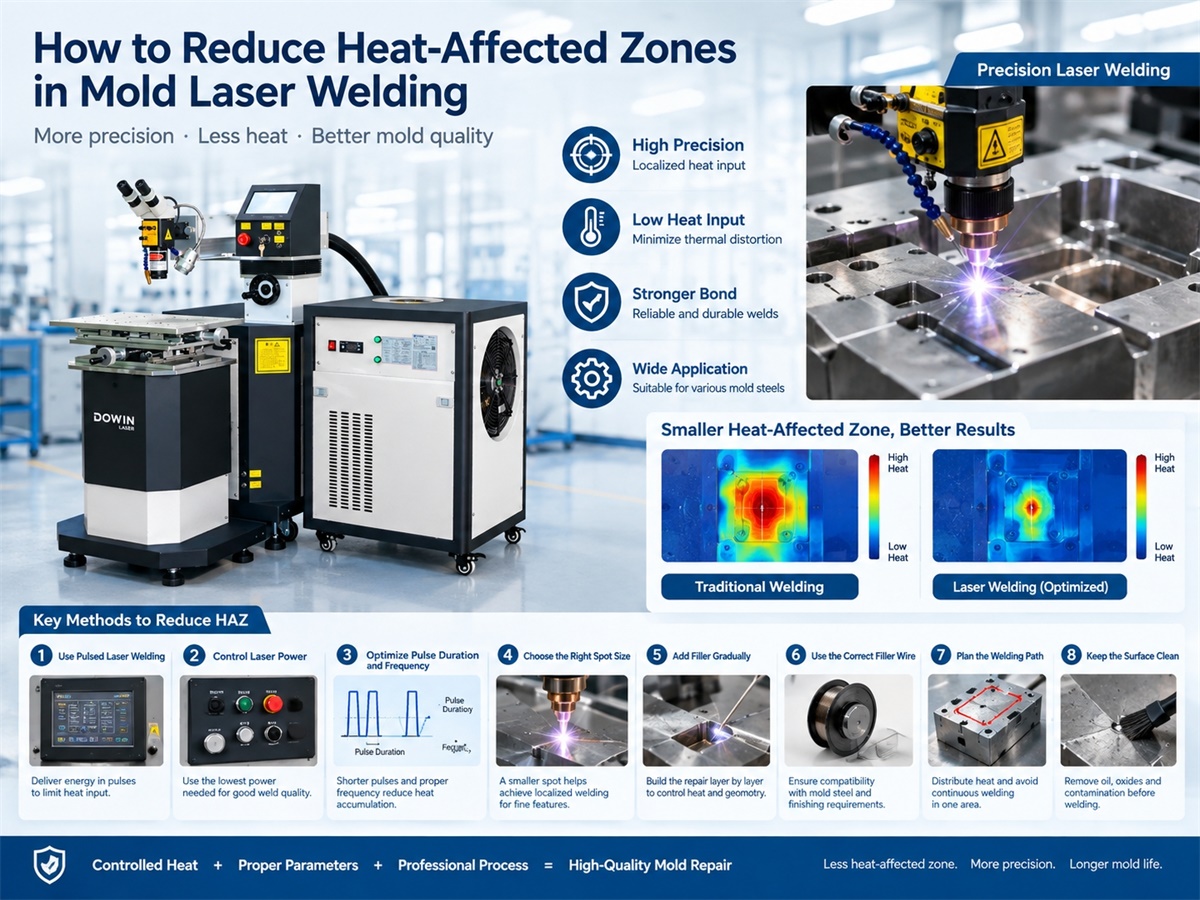
Heat control is one of the most important factors in mold laser welding. Injection molds often contain sharp edges, fine cavities, parting lines, inserts, and precision surfaces where excessive heat can cause distortion, discoloration, cracking, or dimensional changes.
A pulsed YAG mold laser welding machine can significantly reduce unnecessary thermal input by delivering laser energy in controlled pulses. However, the size of the heat-affected zone (HAZ) depends on more than the laser itself. Laser parameters, filler wire, welding strategy, material condition, and operator technique all matter.
This guide explains practical ways to reduce the HAZ while maintaining a reliable mold repair.
What Is the Heat-Affected Zone in Mold Laser Welding?
The heat-affected zone is the area of base metal surrounding the weld that experiences a temperature change but does not completely melt.
In mold repair, excessive heat can potentially affect:
-
Mold dimensions
-
Hardness
-
Surface finish
-
Sharp edges
-
Parting lines
-
Cavity geometry
-
Heat-treated areas
-
Polished surfaces
For this reason, controlling the HAZ is especially important when repairing expensive precision molds.
Why Is Heat Control Important for Mold Repair?
Injection molds are often manufactured from hardened tool steels such as P20, H13, S136, and 718. Their properties depend heavily on their composition and heat-treatment condition.
A large amount of heat introduced during welding can increase the risk of:
-
Mold distortion
-
Excessive thermal stress
-
Cracking
-
Changes in hardness
-
Additional machining
-
Damage to nearby precision features
The closer the repair is to a critical mold feature, the more important localized heat input becomes.
1. Use Pulsed Laser Welding
One of the most effective ways to control heat is to use a pulsed laser rather than continuously applying laser energy.
With pulsed laser welding, energy is delivered in individual pulses. The operator can control parameters such as pulse energy, pulse duration, and frequency according to the repair requirement.
This allows the material to melt locally while limiting unnecessary heat accumulation around the repair.
For precision mold repair, this is one reason pulsed YAG laser welding remains a practical technology.
2. Avoid Using More Laser Power Than Necessary
Higher laser power does not automatically mean better mold repair.
The required energy depends on:
-
Mold steel
-
Material thickness
-
Damage depth
-
Welding wire diameter
-
Required penetration
-
Weld geometry
-
Repair location
If substantially more energy than necessary is applied, additional heat can spread into the surrounding mold material.
A better approach is to establish the lowest practical energy that produces the required weld quality and penetration.
3. Optimize Pulse Duration
Pulse duration directly affects how energy is delivered to the workpiece.
A longer pulse can introduce more heat into the material, while a shorter pulse can provide more localized energy delivery for suitable small repairs.
However, extremely short pulses are not automatically better. The parameters must still provide sufficient melting and bonding.
The goal is to find a balance between:
adequate penetration + stable weld formation + minimum unnecessary heat.
4. Control Welding Frequency
Frequency becomes particularly important when repairing larger areas.
If pulses are applied too rapidly, heat can accumulate because the material does not have enough time to dissipate thermal energy between pulses.
If the frequency is too low, welding efficiency may decrease.
Therefore, the operator should adjust frequency according to the size of the repair and the thermal behavior of the mold.
For larger repairs, a controlled welding sequence can help prevent excessive heat buildup.
5. Use the Correct Spot Size
Laser spot diameter affects both energy density and the size of the welding area.
A small spot can be advantageous for:
-
Fine cracks
-
EDM pits
-
Sharp edges
-
Small cavities
-
Thin features
-
Precision mold details
For larger damaged areas, however, an excessively small spot may require too many passes and increase processing time.
The correct spot size should therefore match the repair geometry rather than simply choosing the smallest possible spot.
6. Add Filler Material Gradually
When material needs to be rebuilt, filler wire should normally be added progressively.
Trying to deposit a large amount of material in a single operation can increase heat input and make it more difficult to control the repaired geometry.
A better approach is to build the damaged area layer by layer.
This provides better control over:
-
Material deposition
-
Weld geometry
-
Heat accumulation
-
Final machining allowance
It is particularly useful when rebuilding mold corners, edges, cavities, and worn surfaces.
7. Control the Welding Path
The welding sequence can also influence heat accumulation.
If the operator continuously welds one small area without allowing sufficient cooling, the local temperature can rise progressively.
For larger repairs, changing the welding position or using an appropriate sequence can distribute heat more evenly.
This technique is especially useful when repairing larger mold surfaces rather than isolated defects.
8. Keep the Mold Surface Clean
Oil, grease, oxidation, EDM residue, and other contamination can affect the welding process.
Before laser welding, the damaged area should be properly cleaned and prepared.
A clean surface helps produce a more stable weld and reduces the need to compensate for inconsistent welding conditions.
If EDM has caused a damaged recast layer or microcracked area, the technician should also determine whether the affected material needs to be removed before welding.
9. Select Compatible Filler Wire
Filler wire affects both welding quality and subsequent mold finishing.
The filler should be compatible with the mold steel and suitable for the required application.
For example, repairing a hardened injection mold requires consideration of:
-
Base material
-
Hardness
-
Heat-treatment condition
-
Required polishability
-
Machining requirements
-
Final surface treatment
Using an unsuitable filler can create problems later during grinding, polishing, EDM finishing, or production.
10. Avoid Excessive Overlap
When multiple laser passes are required, excessive overlap can cause repeated heating of the same area.
Proper overlap is necessary for continuous material deposition, but unnecessary repeated passes increase thermal accumulation.
The operator should therefore balance weld continuity with heat control.
This becomes particularly important when repairing narrow edges and thin mold features.
11. Use Short, Controlled Repair Cycles
For precision mold repair, it is often better to treat the damaged area as a series of small repair zones rather than continuously welding a large region.
A controlled cycle can be:
Weld → inspect → allow heat to dissipate → continue welding → machine → inspect again.
This approach gives the operator more opportunities to monitor the mold temperature and repair geometry.
Which Mold Areas Need the Most Heat Control?
Some areas are more sensitive than others.
Sharp Edges
Edges can lose their original geometry easily if excessive heat or filler material is applied.
Parting Lines
A damaged parting line must be rebuilt accurately because even a small dimensional error can affect mold closing and produce flash on the molded part.
Cavities
Cavity dimensions directly influence the final plastic component, so thermal distortion must be carefully controlled.
Thin Ribs
Thin mold features have limited material mass and can be particularly sensitive to excessive heat.
Polished Surfaces
High-polish cavities require careful repair and finishing because any significant surface disturbance can increase polishing and rework requirements.
Laser Mold Welding vs. Conventional Welding
For precision mold repair, laser welding has an important advantage: the energy can be concentrated into a small area.
| Factor | Pulsed Laser Welding | Conventional Welding |
|---|---|---|
| Heat input | Highly localized | Generally broader |
| Fine repair | Excellent | More difficult |
| Small features | Well suited | Greater thermal challenge |
| Material deposition | Highly controlled | Less localized |
| Mold distortion risk | Lower when properly controlled | Generally higher |
| Precision repair | Excellent | Application dependent |
This does not mean laser welding eliminates heat or distortion completely. Poor parameter selection can still produce excessive heat. The advantage comes from having much greater control over where and how energy is delivered.
A Practical Heat-Control Strategy
For a small injection mold repair, a practical workflow is:
1. Inspect the damage
Determine its depth, size, and location.
2. Prepare the surface
Remove contamination and unsuitable damaged material.
3. Select compatible filler wire
Match the filler to the mold steel and finishing requirements.
4. Start with conservative laser parameters
Use appropriate pulse energy and duration rather than excessive power.
5. Build the repair gradually
Deposit filler in controlled layers.
6. Monitor heat accumulation
Adjust frequency and welding sequence when necessary.
7. Machine the repaired area
Remove excess material and restore the original geometry.
8. Polish or texture the surface
Match the repaired area to the original mold finish.
9. Perform final inspection
Verify dimensions, surface quality, and the repaired feature.
Can Laser Welding Completely Eliminate the HAZ?
No welding process should be described as completely eliminating the heat-affected zone.
Laser welding can minimize and control the HAZ, but the base metal around the weld will still experience some thermal influence.
The objective is to make the affected area as small and controlled as practical while achieving the required weld quality.
This distinction is important when evaluating mold laser welding machines.
Final Thoughts
Reducing the heat-affected zone in mold laser welding is primarily a matter of controlling energy and heat accumulation.
Using a pulsed YAG laser, selecting appropriate pulse parameters, controlling frequency and spot size, adding filler gradually, and using a suitable welding sequence can help minimize unnecessary thermal exposure.
For injection mold repair, the goal is not simply to produce a strong weld. The repaired mold must also retain its geometry, hardness, surface quality, and dimensional accuracy.
A properly configured pulsed YAG mold laser welding machine provides the fine energy control needed for repairing EDM damage, cracks, worn areas, broken edges, cavities, and other precision mold defects.
FAQ
What causes a large heat-affected zone in mold laser welding?
Excessive laser energy, long pulse duration, high welding frequency, excessive overlapping passes, and prolonged welding in one location can all contribute to greater heat accumulation.
Does pulsed YAG laser welding reduce the HAZ?
Yes. Pulsed operation allows laser energy to be delivered in controlled bursts, which can help limit heat input and reduce the size of the heat-affected area compared with less localized welding processes.
What is the best laser power for mold repair?
There is no universal power setting. The appropriate configuration depends on the mold steel, damage size, material thickness, filler wire, and required penetration. Sample testing is recommended for critical molds.
Can laser mold welding repair hardened H13 steel?
Yes. H13 can be laser welded with appropriate parameters and compatible filler material. Its heat-treatment condition and final hardness requirements should be considered during the repair process.
How can mold distortion be minimized during laser welding?
Use controlled pulsed energy, avoid excessive heat accumulation, deposit filler gradually, optimize the welding path, and use appropriate cooling intervals when required. Proper post-weld machining and dimensional inspection are also important.
Post time: Sep-15-2026
